Workspace tour
Guided tour of every Studio surface: the header and scene selector, the zone tree, the Stage, the composition slide-over, and the narrow-viewport drawer.
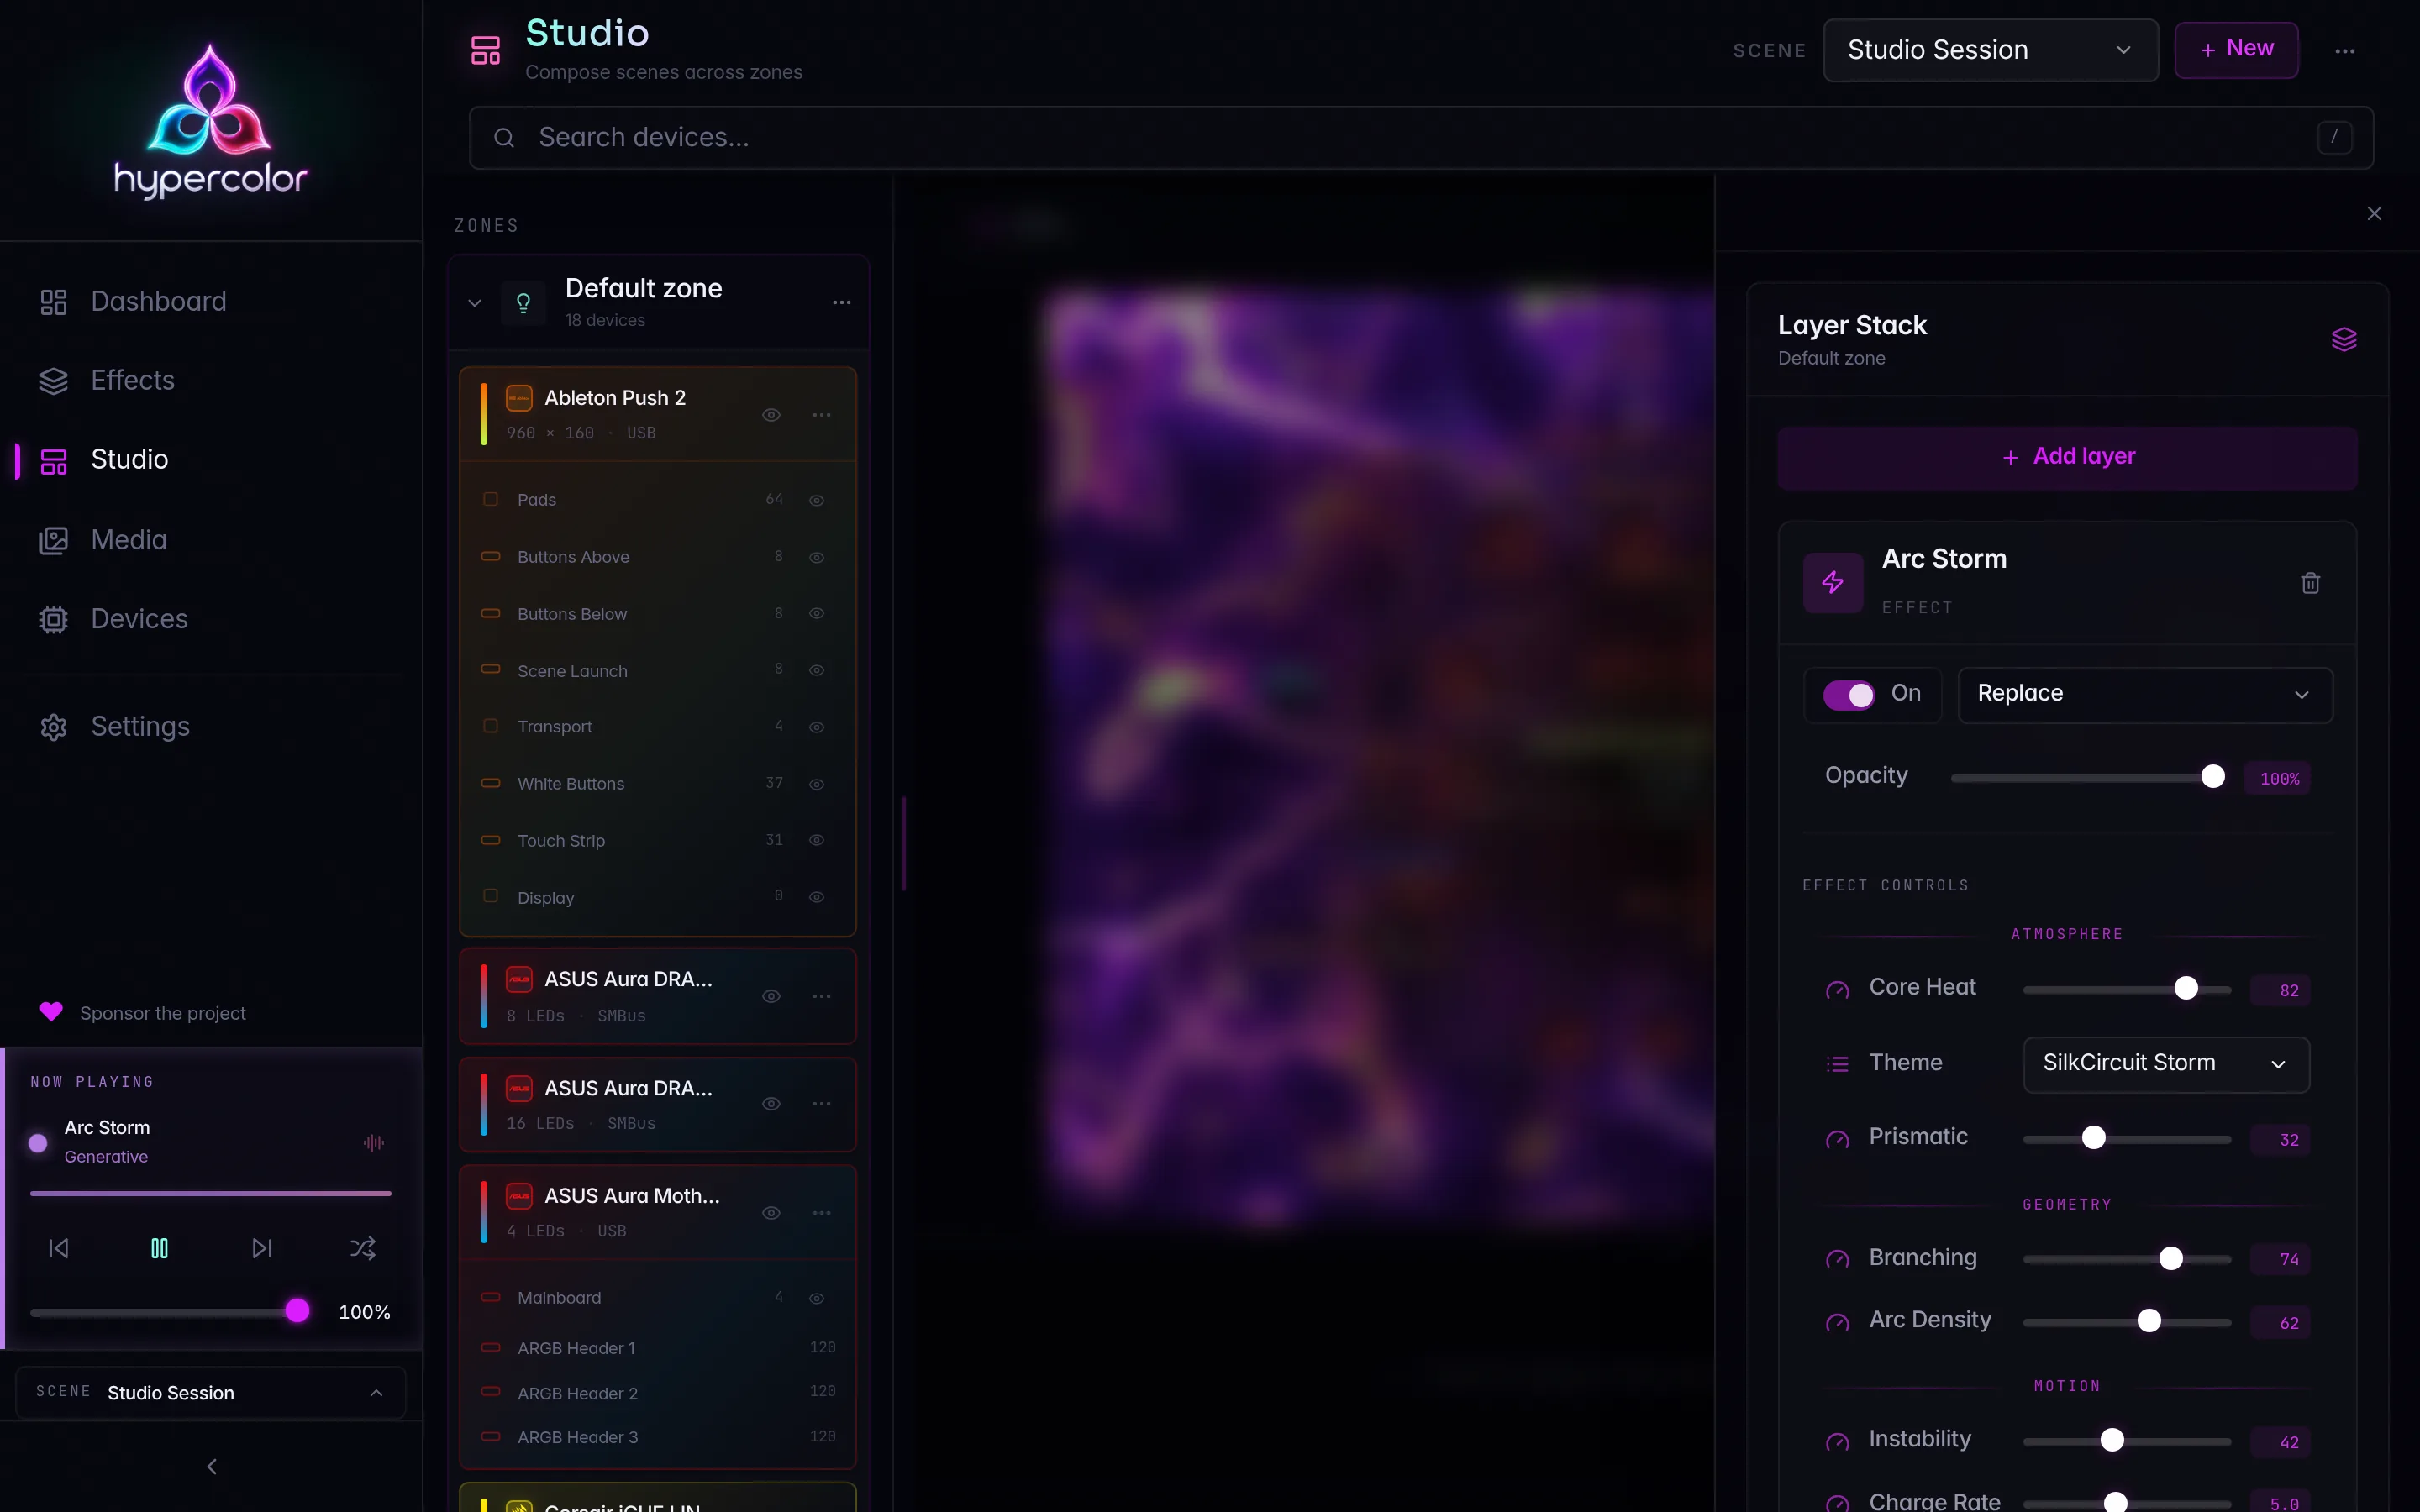
Studio is a two-column workspace. The zone tree lives on the left, the Stage fills the center, and the composition panel slides in over the Stage when you summon it. There is no permanent layer rail and no Preview/Layout toggle. This page walks every surface in order, so you know exactly what each control does before you start composing.
If you want the conceptual model first (what a scene, zone, layer, and layout are), read the Studio overview. This page is the literal UI tour.
#The header
The page header runs across the top of Studio. It carries the Studio title and the scene selector on the top row, and a device search box in the toolbar row below it.
#Scene selector
The scene selector sits at the trailing edge of the header. A scene is a whole-rig configuration: every zone, every layer, every layout in one switchable object. Exactly one scene is active at a time, and switching scenes here re-composes your entire rig. Scene CRUD (switch, create, rename, delete) lives in this control. See Scenes for the full lifecycle.
The active scene is shared app-wide. Studio reads it from the same source the dashboard, sidebar, and CLI write to, kept fresh over the WebSocket. A scene change made from another page, another client, or the command line lands in Studio without a manual refresh.
#Device search
The search box in the header toolbar filters the zone tree. Type any part of a device name and the tree keeps only the matching device rows; an empty box leaves every row visible. The match is a case-insensitive substring on the device name, applied to both assigned and unassigned rows.
The selected LED zone in Studio is also the app-wide effect apply-target. A quick-apply from the dashboard, sidebar, or command palette lands in the zone you are composing. Selecting a Screen or the Unassigned entry is not an apply target, so the target falls back to the default zone.
#The zone tree (left column)
The zone tree answers one question: what hardware do I have, and how is it grouped? It replaces the old surface rail and the separate device palette: devices are visible here, nested under their zones, not hidden behind a drawer.
The tree has up to three sections.
#Zones
Every light zone renders as a card with its color swatch (or a lightbulb icon when it has no color), its name, and a device count. Clicking a zone header selects it and drives the Stage. The selected zone gets a purple border.
Each zone card has three interactive regions:
- The chevron on the left expands or collapses the zone’s nested device list. Collapsed state is remembered per browser.
- The zone header selects the zone.
- The kebab (the three-dot menu on the right) opens zone settings: rename, recolor, enable, and delete. The kebab is always present so even a single-zone scene can rename or recolor its Default zone. Delete stays gated for zones that are not eligible. See Zones for the full set.
A zone that has a failed or asset-missing layer shows a red warning triangle next to its name, so trouble is visible without opening the zone.
Below the device list, each zone offers a way to add hardware. In a single-zone scene, devices that belong to no zone fold in here as one-tap “Available” rows; tap the plus to add one. See Device assignment for the device card, channels, and output-level assignment.
An always-present New zone control sits at the bottom of the Zones section when the daemon supports zone creation.
#Screens
If your rig includes a display face (a small screen treated as a 1:1 surface), it appears under a separate Screens section. A screen row is a single surface with no nested devices; selecting it shows that device’s live face on the Stage.
#Unassigned
The Unassigned entry only appears in a genuinely multi-zone scene, when more than one LED zone exists. It collects device outputs that belong to no zone. In a single-zone scene there is no Unassigned bucket; those outputs fold under the sole zone as Available rows instead.
Selecting Unassigned does not open a layout editor. The Unassigned entry is not a real surface (it has no composited output and no layer stack), so the Stage shows the scene’s policy for those outputs instead (covered below).
#Resizing the tree
On wide viewports a drag handle sits between the tree and the Stage. Drag it to set the tree width, anywhere from 240 to 460 pixels. The width persists per browser, and the Stage takes whatever space is left.
#The Stage (center column)
The Stage is the center workspace for whatever you have selected. It dispatches on the selection.
#A Light: the always-on layout editor
For a light zone, the Stage is the spatial layout editor. The live effect renders under the device boxes, always on, with no view toggle. This is where you arrange device outputs on the zone’s own canvas. The full editor (drag, resize, rotate, shapes, compound selection) is documented in Layouts.
The Stage header for a Light carries the now-playing chip on the left and the zone-canvas controls on the right.
The zone-canvas controls appear only once the zone has a layout:
- Undo (
Ctrl+Z) and Redo (Ctrl+Shift+Z) for layout edits. - Revert and Save for the zone’s layout. Save doubles as the dirty indicator: it glows green when you have unsaved changes and dims when the layout is clean. Revert discards your in-progress edits.
#A Screen: the live face
For a display-face screen, the Stage shows that device’s live face. The header carries a Preview label and an external-link button that opens the face in a full-screen preview tab. A caption below the preview reports the screen’s resolution as width×height.
Two screens of the same resolution are not yet fully distinguishable in the preview, because the preview frame stream does not carry a device id. The Stage accepts a frame only when its resolution matches the selected screen, which rejects in-flight frames from a previously selected screen. Daemon-side frame tagging is the planned fix.
#Unassigned: the policy panel
Selecting the Unassigned entry shows the scene’s unassigned-lights policy instead of an editor. Device outputs in no zone follow one of three behaviors:
- Turn off: the outputs go dark.
- Hold last colors: the outputs keep whatever they last showed.
- Follow
<zone>: the outputs mirror a chosen LED zone.
This policy is editable only when the daemon advertises the scene-unassigned-behavior-write capability; otherwise it renders as a read-only label. To give these outputs a real layer stack, assign them to a zone with the green + on a device card in the zone tree.
#The degraded banner
When the selected surface has a layer that failed to render or is missing its asset, a red Degraded banner appears at the top of the Stage. It is the surface-level alarm; open the composition panel to see exactly which layer is unhappy.
#The now-playing chip
The now-playing chip lives at the left of the Stage header for every surface, Light and Screen alike. It shows the name of the surface’s top layer, or “No layers” when the stack is empty.
Clicking the chip toggles the composition slide-over. This is the only way to summon layer editing in the two-column workspace, which is what keeps the Stage uncluttered.
#The composition slide-over
The composition panel slides in over the Stage from the right edge when you click the now-playing chip. It hosts the layer stack (the per-zone list of effects, faces, media, and other inputs), and it overlays only the Stage, never the zone tree.
Dismiss it three ways: click the scrim behind it, click the close button in its top-right corner, or press Escape.
The panel is the same layer editor used elsewhere in the app, so what you learn here transfers directly. Layer mechanics (adding a layer, blend modes, opacity, transforms, reordering, and per-layer health) are covered in Layers, and live effect controls in Effects and controls.
Selecting the Unassigned entry and opening the panel shows a “No layer stack” note instead of an editor, because unassigned lights belong to no zone and have nothing to compose.
#The narrow-viewport drawer
On narrow viewports the zone tree collapses into a slide-over drawer to free the Stage. A Zones button appears in a strip below the header (it is hidden on wide viewports, where the tree sits permanently beside the Stage).
Tapping Zones slides the tree in from the left over a dark scrim. Picking a zone from the drawer selects it and closes the drawer, revealing the Stage behind it. Tapping the scrim dismisses the drawer without changing your selection.
#Where to go next
- Studio overview: the Scene → Zone → Layers + Layout model.
- Scenes: switch, create, rename, and delete whole-rig configs.
- Zones: create, color, enable, and delete partitions.
- Device assignment: the device card, channels, and assignment.
- Layers: the layer stack, blend modes, and health.
- Layouts: the spatial canvas, drag, resize, and save.
- Multi-zone walkthrough: build a second zone end to end.