Multi-zone walkthrough
Build a second zone, split devices, run different effects per zone, switch between zones, and set the unassigned-lights policy.
By the end of this walkthrough your rig runs two effects at once: one effect on the keyboard and case, a different effect on the desk strips, switched together when you change scenes and tunable independently while they play. You will build a second zone, move device outputs into it, give each zone its own effect, hop between zones, and decide what happens to any output you leave behind.
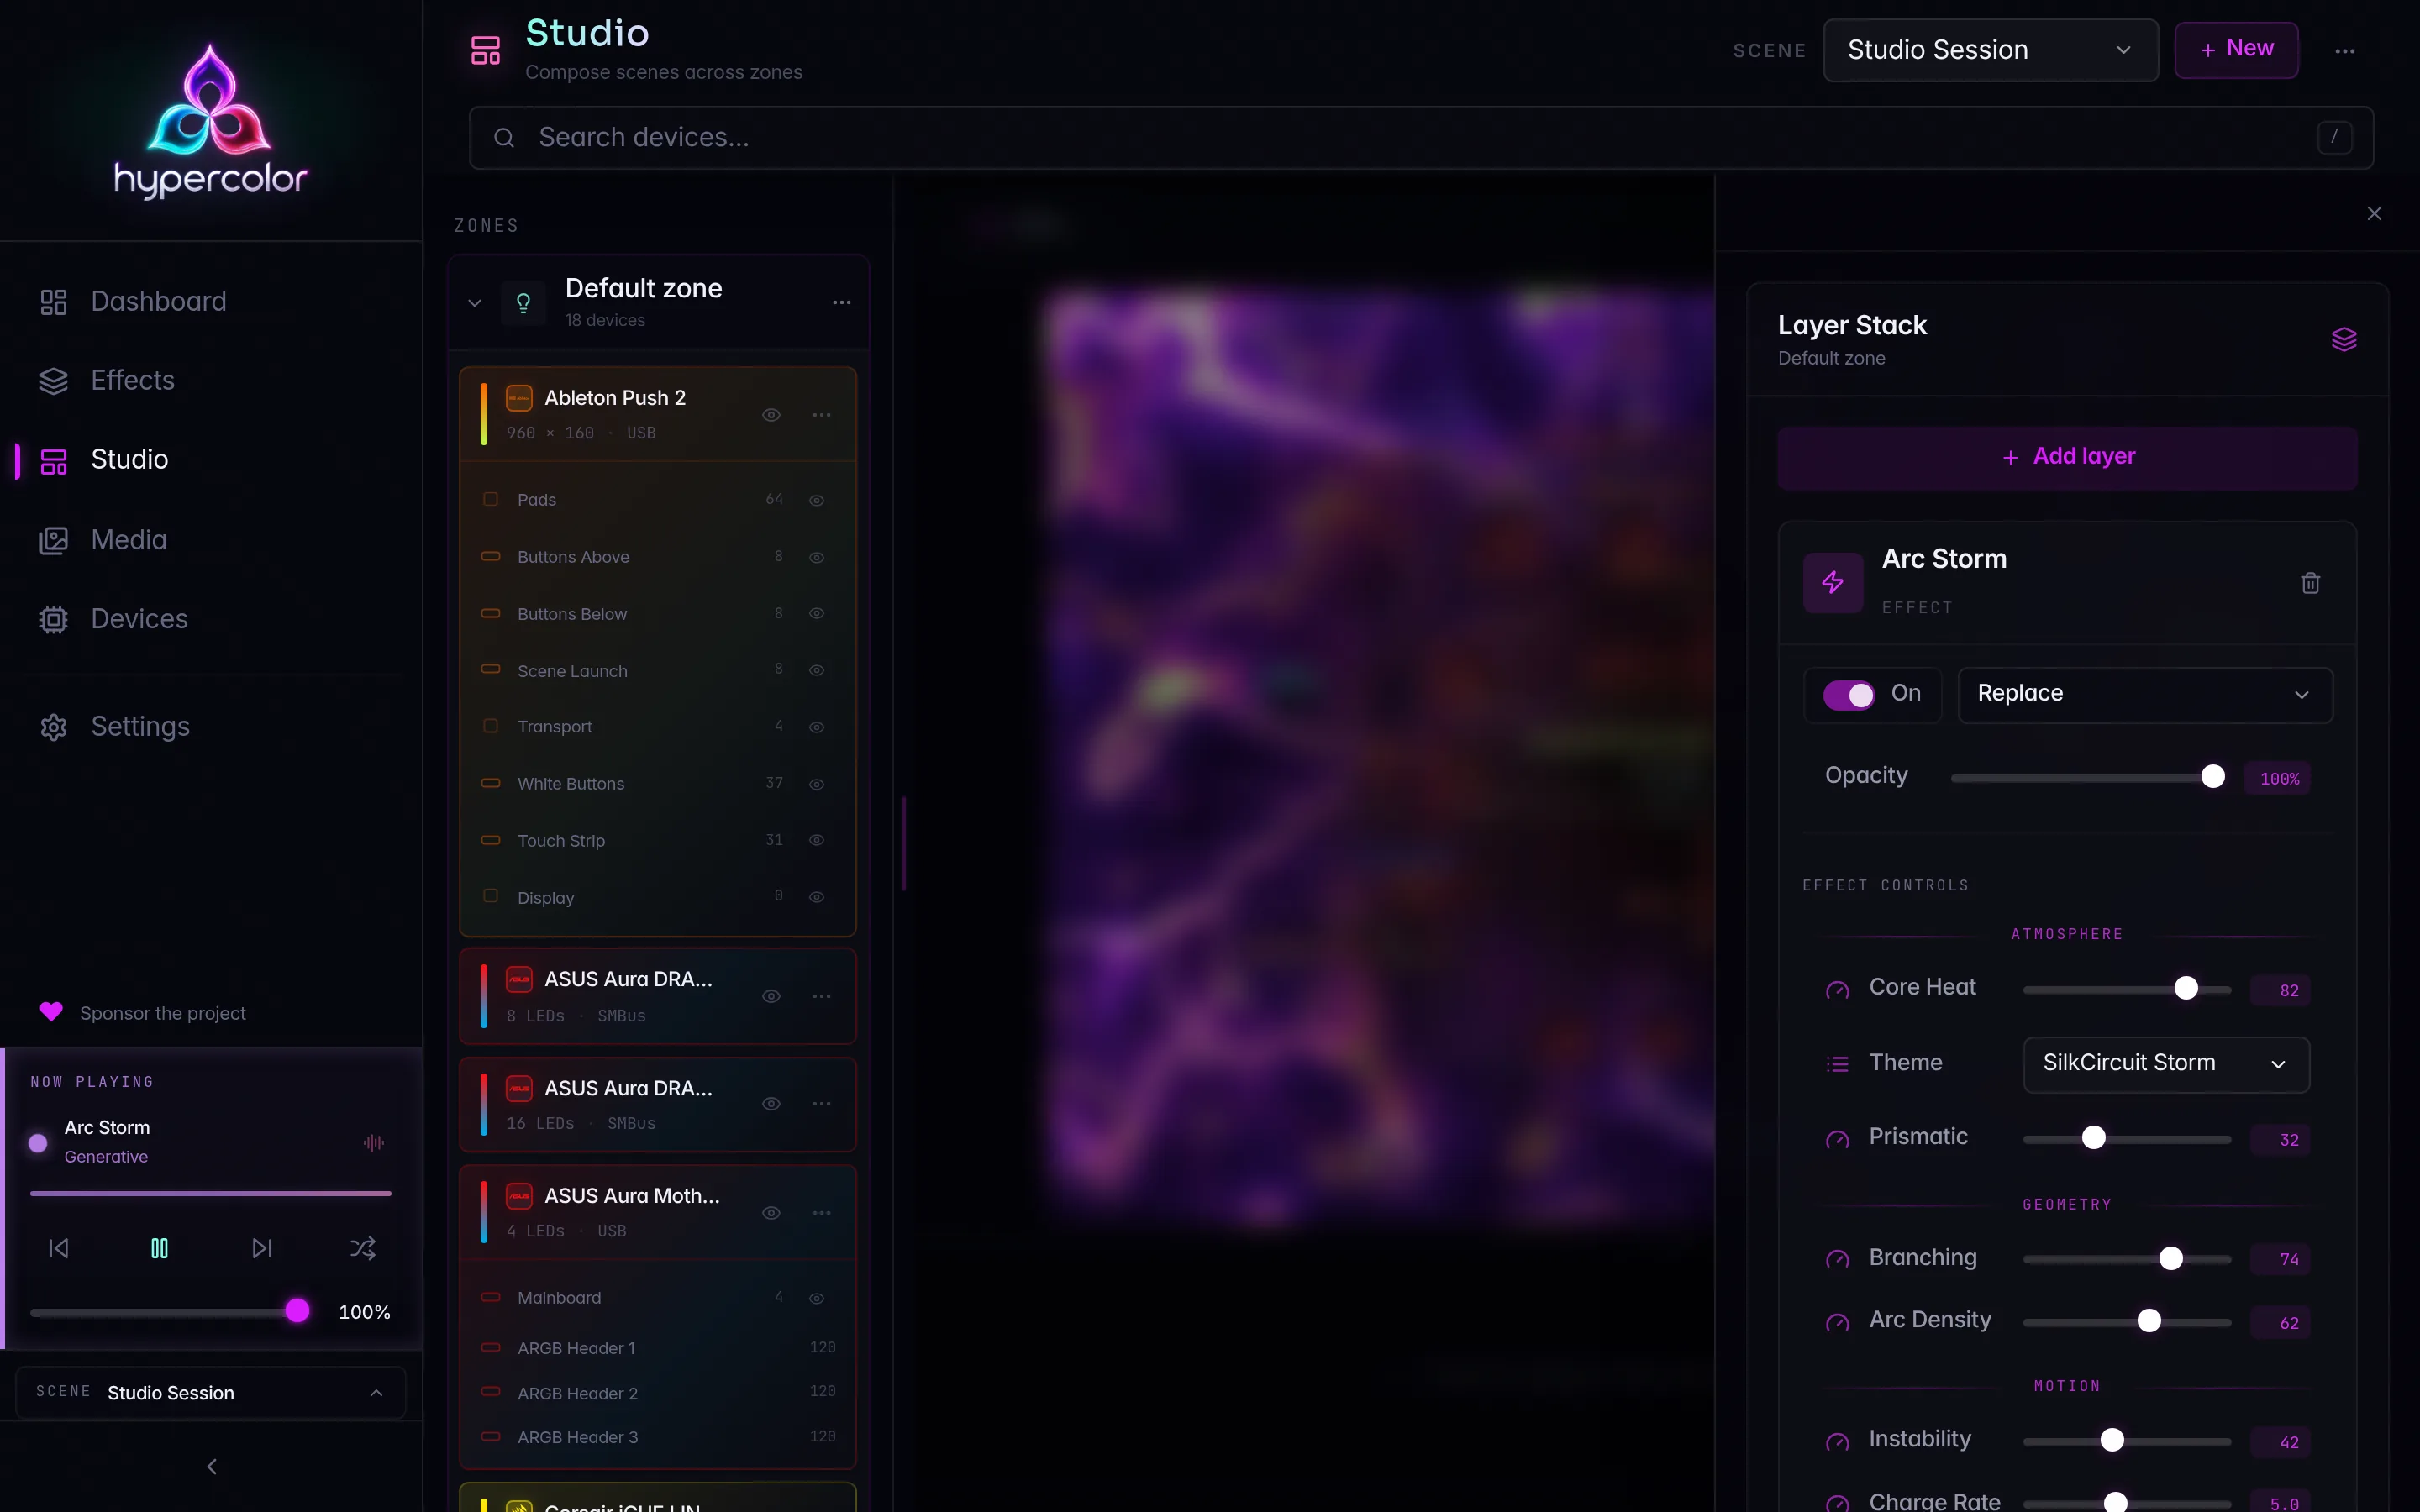
This is the end-to-end version of the focused pages. If you want the model first, read Zones, Device assignment, and Layers, then come back here to put it together.
A scene is the whole-rig configuration. A zone is a flexible partition of that scene’s canvas. One scene holds many zones, each driving a disjoint set of device outputs. Switching scenes swaps every zone together; this walkthrough lives entirely inside one scene.
#Before you start
Open Studio in the web UI and confirm two things:
- More than one LED device (or one device with multiple addressable channels) is connected, so there is something to split. See Finding devices if your rig is empty.
- A scene is active. A fresh install gives you a default scene with a single Default zone that already owns every device. That single zone is your starting point.
The left column is the zone tree. The center is the Stage. For a Light the Stage is the always-on spatial layout editor with the live effect rendering under the device boxes. There is no Preview/Layout toggle to hunt for.
#1. Create a second zone
In the zone tree, use New zone under the Zones section. It opens an inline name field; type a name you will recognize later (“Desk strips”, “Ambient”) and press Enter to create the zone. Give it an identity color afterward from the zone’s controls in the tree (see Zones). That color is the zone’s swatch throughout Studio, including the zone tree you are about to use.
The new zone starts empty: no device outputs, no layers. Your original Default zone still owns everything. Creating a zone never moves devices on its own; that is the next step, and it is deliberate.
The moment a scene has more than one LED zone, Studio switches on the multi-zone affordances: a synthetic Unassigned entry appears in the tree, and each placed device card’s kebab grows a Move to <zone> row per other zone. In a single-zone scene neither shows, because there is nothing to partition.
#2. Split devices across the two zones
Every device output starts in the Default zone. You move outputs out of it and into your new zone. The model’s unit of assignment is an output (one device output or addressable segment), so a multi-channel controller can in principle have one channel in one zone and another elsewhere. Studio’s rail always moves a device’s outputs together; per-segment placement is API-only for now.
You have two ways to move a device between zones, both in the zone tree.
#Add a whole device to a zone
On the target zone, use the Add device control. It opens a picker of every device that is not already entirely in this zone. Each entry shows where the device currently lives, for example Desk Strip (in Default zone), so you can see what the move pulls from.
Picking a device brings every output it has into this zone. A device already placed in another zone is moved (its outputs are reassigned out of their old owner). A device the scene has never placed is minted fresh, one output per channel. Either way the daemon resets each output’s canvas placement on assign, so you re-place it in the target zone’s layout editor afterward.
#Move a placed device out of its current zone
On a device already sitting in a zone, open the card’s ⋯ kebab (“Device options”). In a multi-zone scene the menu carries one Move to <zone> row per other LED zone, plus Remove from zone. One click reassigns every output the device has here, so you never leave the tree.
Splitting a single multi-channel controller across two zones is not available from the rail: both paths move the whole device. The wire supports it (POST /api/v1/scene/zones/{zone}/members takes a per-member segment), so an API client can place individual segments.
Each device output belongs to exactly one zone at a time. Assigning an output to a new zone always removes it from its previous owner. There is no “copy an output into two zones”; exclusivity is the invariant that keeps each zone’s output correct.
#3. Re-place outputs on each zone’s canvas
Each zone owns its own spatial canvas. Moving an output between zones keeps its topology and LED mapping but resets its position to the target zone’s default, because a position is only meaningful against a specific canvas.
Select a zone in the tree to switch the Stage to that zone’s layout. Drag, resize, and rotate the device boxes to match the physical arrangement, then use Save in the Stage header. Revert discards unsaved edits; both light up only when the canvas is dirty. Undo and redo are Ctrl+Z and Ctrl+Shift+Z. The full editor is covered in Layouts.
Positions are normalized to [0.0, 1.0], so a layout stays correct no matter what resolution the canvas runs at. The canvas defaults to 640×480 and is configurable.
#4. Give each zone its own effect
Select a zone, then open its composition by clicking the now-playing chip in the Stage header. That slide-over hosts the layer stack for the selected zone. Add an effect layer, browse the catalog, and pick what you want. Each zone gets an independent effect, controls, and brightness.
Repeat for the second zone. Now the keyboard and case can run one effect while the desk strips run another, both live at once. The catalog and per-layer controls work the same as on any single-zone scene; see Effects and controls and Layers for blend modes, opacity, and live tuning.
Every zone shares the daemon’s global audio, screen-capture, and sensor inputs. An audio-reactive effect in one zone and a static effect in another both read the same audio; the static one simply ignores it. Per-zone input routing (a zone capturing its own monitor) is future work.
#5. Switch between zones
Selecting a zone in the tree is how you move between them. The selected LED zone is also Studio’s app-wide apply target, so a quick-apply from the dashboard, the sidebar, or the command palette lands in the zone you are composing rather than spraying every device.
Per-zone now-playing rows in the sidebar let you pause and resume a single zone without touching the others. The sidebar shows up to three of them and folds the rest behind a “more zones” link back into Studio. See Now playing and transport for the transport surfaces.
Switching the active scene is different: it swaps all zones together. Your two-zone arrangement is one configuration inside one scene. Scenes covers creating, renaming, and switching whole-rig configurations.
#6. Set the unassigned-lights policy
If you split devices and leave an output in no zone, it becomes unassigned. That happens deliberately (you moved everything out of the Default zone) or as a side effect (you deleted a zone, and its outputs fell out). The scene decides what those outputs do.
In a multi-zone scene the tree shows a synthetic Unassigned entry. It is not a surface (no layer stack, no canvas), so selecting it shows the scene-level policy instead. Pick one of:
- Turn off: unassigned outputs are cleared to black. This is the default.
- Hold last colors: unassigned outputs keep whatever they last rendered.
- Follow <zone>: unassigned outputs are routed through a named zone, so they mirror that zone’s effect.
The policy is editable only when the daemon advertises the scene-unassigned-behavior-write capability; otherwise the current setting shows read-only. The Unassigned Stage also reminds you to use the + on each device card in the rail, so you can pull those outputs into a real zone at any time.
A partially assigned multi-channel device is handled per output. Its assigned channels render from their zone; its unassigned channels follow the unassigned-lights policy. You never have to assign a whole device just to satisfy one channel.
#What you built
One scene, two zones, two effects, a defined fate for everything in between:
graph TD
    SCENE[Active scene] --> Z1[Default zone
keyboard + case]
    SCENE --> Z2[Desk strips zone]
    SCENE --> UN[Unassigned outputs]
    Z1 --> E1[Effect A]
    Z2 --> E2[Effect B]
    UN --> POL[Unassigned-lights policy:
off / hold / follow a zone]
Both zones render concurrently and switch together when the scene changes. Per-zone control edits change one zone without disturbing the others. To make the same split your everyday look, save it as part of a scene and switch to it whenever you want it back.
#Where to go next
- Zones: the full zone lifecycle: rename, color, enable, delete.
- Device assignment: the device card, channels, hide, identify, and remove.
- Scenes: saving and switching whole-rig configurations.
- Zone API and concurrency: the REST routes and the single scene
revisionconcurrency contract behind every move you just made.